mutteringhousewife

Adventures in cooking, travel and whatever else I feel like musing on

Category: Baking

Custard Tarts

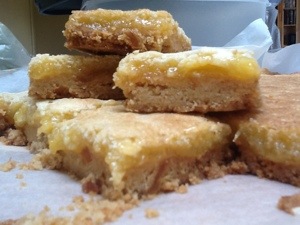
Cast your mind back to the lemon slice blog. Remember how I said I’d worked on it a lot? By the way, three whole eggs will make the curd set better than five egg yolks, but that will muck you up if you’re making friands. Here’s a recipe that is in the early stages of working out. I’ll show you the picture, they really don’t look that bad…

20120903-153239.jpg
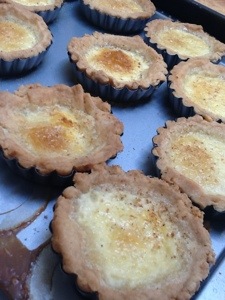
But they just didn’t work. I normally make a large custard tart, and I’ve never been really happy with that either. Never quite got the pastry right. Also a pain to lever out of the dish, and you have to have it on a plate, blah blah blah. Tartlets seem like an easier way to eat them. I got some Bakers Delight tartlet cases from Peter’s of Kensington, and that shop is a whole ‘nother blog in itself. They have a little disc in the bottom that allows you to push the tartlet out of its case, and they worked very well, they can stay in the recipe.

I was also happy with the pastry. I went back to the 1970 Women’s Weekly cookbook, an essential guide for any housewife, and they suggested using a Biscuit Pastry. And how right they were. Here’s the recipe for that.

90 grams butter (obviously they said 3 oz, but I’m translating)
1/4 cup sugar
1 egg
1 1/2 cup flour
1/2 teaspoon of baking powder (they actually specified 1 1/4 cup plain flour and 1/4 cup self raising flour, but I’ve never seen the point of self raising flour, just add baking powder, how hard could it be?)

Beat butter until creamy, add sugar and beat until just combined. Apparently overbeating at this stage will make pastry difficult to handle, like a housewife without her Bex. Work in flour and baking powder. Turn dough onto a lightly floured board and knead lightly until smooth. Refrigerate 30 minutes before using. I thought I’d need one and half times the recipe for 12 tartlets, and I was about right. Yes, I know you can’t get one and a half eggs, I just used a really big one, OK?

Now, I don’t know about you, but when I roll out cold pastry, it breaks up and looks a lot more like a Norwegian coastline than the smooth circle in the book, but I charge at it. You want it fairly thin for tartlets, I think mine was a bit too thick at about 4mm. I upend the cases on the pastry and draw a circle around them with a knife about one cm away from the circumference, and this also appears to be about right. Nearly half need to be cobbled together from bits of coastline, perhaps next time I should squash them up and roll them out again.

At this point I foolishly deviated from the recipe and baked the tartlet cases. Here’s the custard recipe
3 eggs
1 teaspoon vanilla
2 tablespoons sugar
1 pint milk
Nutmeg
You beat the eggs, vanilla and sugar together while multitasking by heat the milk in a saucepan. Gradually stir the warm milk into the egg mixture. Then, you’ll need to decant it into a jug so you can get it into the tartlet cases without tipping it all over the Caesarstone. It was probably about twice as much custard as I needed, so I put the overflow into two ramekins and baked it too.

Bake in a moderate oven for about 15 minutes, then slide them out and grate a bit of nutmeg of each one. Slide them back in for another 15 minutes while you apply aloe vera to your burnt knuckles. Watch in despair as the custard seeps into the pastry, and in some cases, through the holes in the pastry and onto the baking tray holding them up.

The kids ate them anyway, but I am filled with a quiet determination that these shall not conquer me. Perhaps next time I might follow the recipe. Or maybe an egg wash over the cases? Maybe a thicker custard………

Better Lemon Slice

Most recipes that I tweak with only usually need an adjustment in the type of sugar, or a bit more or less butter, or something fairly minor for me to add it to the collection. Not this one. I had been on the hunt for the perfect lemon slice for some time, but the Women’s Weekly one was just adequate, the Donna Hay one a bit gloopy and I didn’t like the base. The recipe I lay before you today is almost right. Possibly still a little gloopy, but not unacceptably so.

The recipe for the base I unashamedly stole from a fascinating book called The Good Cookie, by Tish Boyle. This book was given to me by my worthy and esteemed brother-in-law, who also happens to be a B grade celebrity chef. If you’re the kind of housewife that lounges about the place watching telly and eating chocolate, you would have seen him on daytime TV. His celebrity status should be much higher, as he is an excellent chef, festooned with hats.

Place in a bowl one and a quarter cups of flour, 125 grams of room temperature butter, one quarter of a cup of brown sugar and two tablespoons of finely chopped crystallized ginger. The ginger is optional, but try it with, I love it. You could possibly use the stuff in syrup in a jar if you can’t find the sugar coated crystallized stuff, but gosh you’ll be sticky after chopping it up. Get in there with your hands and rub the butter in until what you appear to have is a bowl of breadcrumbs. Tip this into your roasting pan line with baking paper (mine is 20 by 27 cm) and press it down. Bake in a 180 degree oven for about twenty minutes, or until it is starting to colour on top.

Meanwhile, you’ll be making the topping. Separate five eggs into two different bowls, you’ll be using the yolk component. You could just use three whole eggs if you’re not planning to make friands at the same time in the other bowl. To the five egg yolks add one and a half cups of caster sugar, one third of a cup of lemon juice, one quarter of a cup of plain flour, half a teaspoon of baking powder and the zest of two lemons. Obviously lemons come in a wide range of sizes, so let’s say two moderately small ones. I zest citrus fruit a lot and use the Microplane for it, it’s also super for grating nutmeg and am I starting to sound like Martha Gardner? I’d recommend growing your right thumbnail long if you’re going to use the Microplane regularly, emery boards are cheaper than band aids.

Whisk that lot together and pour it straight onto the base you’ve just taken out of the oven. It will make a pleasing sizzling sound. You don’t really have to do it straight away, that’s just how it worked out today. Stick it back in the oven and bake it for a further twenty minutes or so. You want the top fairly well coloured to make sure that it sets when it cools down. Don’t even think about cutting it up before it has cooled down. When you’re piling it into the Tupperware you’ll have to separate each layer with a sheet of baking paper, because they do tend to stick together.

One slight disadvantage to this recipe is that if your kitchen is on a lean because your house is slowly sinking into the swamp, there will be one side slightly more lemony than the other. But who could be bothered turning it halfway?

20120828-144059.jpg

Raspberry Slice

This one is still a work in progress. I asked the Horror what he’d like for afternoon tea and possibly in his lunchbox on Monday. He had to consider for quite some time, and finally came up with raspberry slice. He had reservations about taking it in his lunchbox because it has a tendency to shed, and he can be quite a finicky child. However he thought it probable that it would all be eaten on the weekend and the issue would not arise.

Using your hands, rub together 125 grams of nice butter with 1 1/2 cups of flour and 1 teaspoon baking powder. You don’t have to do it to crumb stage, but fairly well rubbed in. Mix in an egg. Gather dough into a fairly crumbly ball and dump into a lined roasting tray, mine is 20 by 27 cm and I only just get enough coverage. Press it down into a reasonably well packed layer. Bake for 10 to 15 minutes, or until just starting to change colour.

While that’s baking, mix together 1/2 cup caster sugar, 1 egg and 1 cup desiccated coconut. This is an occasion for using the expensive coconut you bought from Honest to Goodness at the markets on the weekend, it makes a noticeable difference.

You don’t have to wait for the base to cool before you spread it with raspberry jam, or any other jam you may be trying to get rid of. It’s the major flavour, so I don’t recommend the Home Brand plum jam. You have to slice that stuff anyway.

Hoik on the coconut mixture with a fork and spread it out relatively evenly. Bake it at 180 C for a further 25 minutes, or to taste – I like it fairly brown and crunchy on top, but you may not. Wait until it’s completely cook before cutting it up, although it’s probably best to nip a bit off the corner while still warm to make sure it’s not poisonous.

20120824-161004.jpg

The picture is the slice under construction. I’m still not terribly happy with the base, it’s a touch too crumbly. It holds together OK, but I’d like something a bit more uniform, without being tough. I’ll let you know when I work it out.

Biscotti

Biscotti is one of those things I like to always have in the pantry, because it lasts for ages, unless you eat it, and it seems to impress people well out of proportion with how difficult it is to make. I adapted a Donna Hay recipe. I find her cookbook designs extremely irritating, but the recipes are great. Here’s what I do:

In a bowl, mix together 2 cups of flour, 1 1/2 teaspoons of baking powder, 3/4 cup of caster sugar, 3 eggs and your flavouring. My family’s favourite is hazelnut and vanilla, so I’d add a cup of whole hazelnuts and 3 teaspoons of vanilla, because I make my own vanilla and it’s a bit weak. If you used bought vanilla, use 2 teaspoons. My personal favourite flavouring is 1/2 cup cranberries, 1/2 cup shelled pistachios and 1 teaspoon of vanilla, but nobody else likes those because they are ignorant Philistines.

The mixture will be a bit dry to start off with, but get in there with your hands and knead it together until you have a smooth dough, apart from the nuts. If you’ve used large eggs you may need a bit more flour, the dough should be quite stiff. Form the dough into two logs and place them on a lined baking tray. You can amuse yourself by making square or triangle cross section logs if you want to pretend you’re helping out at preschool. Bake at 160 degrees C for about thirty five minutes, or until they’re starting to go a bit golden.

After you take them out of the oven, let them cool completely. What I’d then strongly recommend is wrapping them in a tea towel, putting them somewhere that the ants can’t get them and leaving them overnight. Then you can cut them with a sharp knife, once again you can choose to amuse yourself by seeing how finely you can slice them, but I like them on the robust side. Arrange them on lined baking trays and bake at 160 degrees for about ten or fifteen minutes – until they’re just starting to colour. Cool completely, then stick them in Tupperware.

I like this recipe because it doesn’t require you to mess about with egg whites, which I avoid as much as I can. I’ve tried biscotti made with egg whites, and they are more delicate, the kind of thing you’d serve with coffee when the boss came around. But these are destined for the lunchbox, because apparently at high school you can bring nut products so long as you refrain from licking anyone with an allergy.

20120823-123912.jpg

Anzac biscuits

Apparently I make quite a fine Anzac biscuit. I should hope so, I worked on the recipe for ages. My family likes it crunchy and dark, so here’s what I do.

Melt 125 grams of butter and a tablespoon of golden syrup in a small pan. I use a small Vision pan, it appears to made of toughened glass and I snaffled it from my Nanna shortly after she went into a nursing home. I know I’m a scientist and everything, but microwaving stuff gives me the collywobbles, so stovetop it is for me.

Meanwhile mix together 1 cup plain flour, 1 cup of oats, 3/4 cup desiccated coconut, 1/2 cup white sugar, 1/4 cup brown sugar, and 1 teaspoon of vanilla essence. In a measuring cup or something mix 1 and a half teaspoons of bicarbonate of soda with 2 tablespoons of boiling water, then tip into the pot of melted butter. Stir it around until it fizzes up, then tip it into the bowl of dry ingredients and mix. It’s quite a dry mixture, but you don’t want it too crumbly. On a dry day you may need an extra 5 grams of melted butter, it can really make a difference.

Squash walnut sized lumps onto a lined baking pan and bake in a moderate oven until really quite brown. Fifteen or so minutes, just keep an eye on it. Let them cool completely before packing them into Tupperware so that they stay crunchy.

20120821-161246.jpg

I think it makes a difference to use a nice butter. I use and recommend Harmonie Danish butter, not because it’s organic (it has travelled from Denmark, totally negating its environmental credentials), but because you can actually taste the difference. You can recommend some Australian organic butters to me, but all the ones I’ve tried are on the cheesy side and are best in savory recipes. I’ve also tried using organic coconut and oats from Honest to Goodness, but that just makes me feel good, you can’t taste them. You can tell in a raspberry slice, but that’s a whole other post.

So that’ll weigh down the lunch boxes for a couple of days.

Strawberry muffins

The muffins are done and some kids are home. Man of the house thought they were delicious. I thought they were nice, but too light. The Horror said the pieces of strawberry were scary and refused to finish it. Difficult to get the Moose’s opinion, as his father is outlining an extremely complicated plan for the last of the soccer trainings, but he is eating it without gagging.

20120815-155432.jpg

Maybe I should try it with cooked strawberries to avoid startling anyone.